Wednesday, November 30, 2011

Salted Caramel Frosting

This recipe kept popping up on the Pinterest website so I had to see if I could find it online.  I am sharing the link to CHOW.com so you can check out more of their great recipes.  Enjoy!


Salted Caramel Frosting Recipe


By 
Salted Caramel Frosting
Difficulty: Easy | Total Time: Active Time: Makes:2 cups

Looks can be deceiving: This frosting may resemble plain old vanilla, but one bite proves it’s much more. The addition of dark, slightly bitter caramel and an extra pinch of salt lends sophistication. Top some Vanilla Bean Cupcakes with this for an adult take on a childhood favorite.
Game plan: We used this frosting immediately after making it and again after it had set up, and found we liked it better after it had cooled and hardened slightly. However, if you’re in a hurry, you can use it right away; the frosting just may not be as perky as you’d like.
This can be made ahead, tightly covered, and refrigerated—it will last up to 7 days. Let it come to room temperature before using. One batch will frost 24 cupcakes.
INGREDIENTS
  • 1/4 cup granulated sugar
  • 2 tablespoons water
  • 1/4 cup heavy cream
  • 1 teaspoon vanilla extract
  • 12 tablespoons unsalted butter (1 1/2 sticks), at room temperature
  • 1 teaspoon kosher salt
  • 1 cup powdered sugar
INSTRUCTIONS
  1. Briefly stir together granulated sugar and water in a small saucepan and bring to a boil over medium-high heat. Continue cooking, without stirring, until mixture turns dark amber in color, about 6 to 7 minutes.
  2. Remove from heat and slowly add in cream and vanilla, stirring with a wooden spoon until completely smooth. Set aside until cool to the touch, about 25 minutes.
  3. Combine butter and salt in the bowl of a stand mixer fitted with the paddle attachment and beat on medium-high speed until light in color and fluffy, about 3 minutes. Reduce speed to low, add powdered sugar, and mix until completely incorporated.
  4. Turn mixer off and scrape down the sides of the bowl, then add caramel. Beat frosting on medium-high speed until airy and thoroughly mixed, about 2 minutes. Cover and refrigerate until stiff, about 45 minutes, before using.

    http://www.chow.com/recipes/12100-salted-caramel-frosting

Sunday, November 27, 2011

Saag Paneer (Indian spinach dish with homemade cheese)

This may be the best thing you will ever put in your mouth!

Ingredients:
Paneer, approximately 8 oz., cut into 3/4 inch dice (see previous post for paneer preparation) 
all purpose flour (I substituted coconut flour)

Ghee, 2 oz (ghee is clarified butter)
green pepper, 1 medium, diced (I substituted red pepper because greens do not agree with me)
1/4 cup raw cashews
1 lb washed spinach

Ghee, 2 oz (in addition to the above amount)
1/2 lb onion, diced
1 tablespoon ginger, julienned 
1 teaspoon turmeric
4 jalapeno peppers, finely minced (you may vary amount according to taste,but this is not too spicy)
water, as needed
salt, as needed
2 red bell peppers, cut into 1/2 inch dice
2 teaspoons garam masala (recipe at bottom of post)

Prep work:
If you buy spinach this way, and I suggest that you do because it is cheaper,
it is important to wash it several times.
I like to immerse the stemmed leaves in a large bowl of water,
drain, and repeat twice more.


Jalapenos:  see my gloves?!

cut off the ends first

make one cut, lengthwise, and open the pod

remove the seeds

slice lengthwise into thin strips


then cross-cut the strips into fine dice


cut the paneer into 3/4 inch dice.  Toss with flour.
I used coconut because it is lower carb and higher in fiber & protein

julienned ginger

Here is the mise en place
Cooking Method:
1. melt 2 oz ghee.  Cook the nuts until they begin to brown slightly.
2. Add the single bell pepper, cook gently until it is tender.
3. Add spinach, season with salt and cook until wilted.
4. Remove from heat. Puree in a blender or food processor until smooth. (be sure to remove the central vent in blender or food processor because the steam will cause an explosion otherwise!). Set aside.

5. Dust the paneer with choice of flour.  Cook in vegetable oil until it is lightly browned on all sides.  Set aside.

6. In remaining ghee, sweat the onions until very tender and slightly browned.
7.  Add the ginger and cook for one more minute.
8. Add turmeric, jalapenos, and red peppers and sweat gently until the red peppers begin to soften.
9.  Add spinach puree along with enough water to create a smooth sauce. Simmer for about 3 minutes and adjust seasoning with salt.
10. Add the fried paneer and garam masala.
11.  At service, add about 1-2 tablespoon of ghee to mellow the sauce (optional).


saute cashews in ghee
add red (or green) peppers

add spinach

cook until wilted

transfer to food processor (remember to remove the central core to allow heat to vent!)
Process until smooth


Place paneer in a pan with pre-heated oil, such as grapeseed.
Cook until each side is slightly browned.

Remove and set aside.

In remaining ghee, sweat onions until transparent and add ginger.
Cook another minute.

Add turmeric, jalapenos, and red peppers and sweat gently until the red peppers begin to soften.

Add spinach puree along with enough water to create a smooth sauce. and simmer for about 3 minutes and adjust seasoning with salt.

Add paneer and garam masala.
Yum!


Garam masala recipe:
Ingredients:
1.5 tablespoons black peppercorns
1 tablespoons cloves
6 green cardamom pods
3 2-inch pieces of cinnamon stick
6 tablespoons cumin seeds
8 dried chili arbols (stems and seeds removed)

1.  In a dry skillet, toast all spices over a medium heat until fragrant.
2. Transfer spices to a spice grinder and process to a fine powder.

Store in a sealed jar.

Yield:  3/4 cup

Why make your own?  Trust me:  it is 100% more flavorful than anything you purchase pre-made in a store!  Find a place that sells bulk spices and purchse small amounts for this recipe.  Bulk purveyors have greater turnover, thus assuring your spices are fresh.  There is no comparison.

This dry mixture is useful in many dishes, so do not feel it should only be used in this one.  I use it in eggs, salad vinaigrettes, and on meats.  Try it.  You will not be sorry!

Note:  The spinach mixture can be prepared in advance of service and reheated.  I recommend doing this because it seems to enhance the flavor tremendously.  It is simply wonderful.


Friday, November 25, 2011

Making Paneer (Indian Cheese)

If I had known how simple it is to make paneer my family would have been eating it long ago!  We love Indian food, and after taking the "Flavors of India" class at the Culinary Institute I was hooked.  I know possess the absolute best, tastiest recipe for saag paneer that I have ever tasted.
We will begin with the paneer.  It is so simple you won't believe it.

What you need (equipment):
a large pot for heating the milk
a fine mesh colander
cheesecloth (enough to drape the interior of the colander)
2 plates
a jellyroll pan, or something with a lip that two plates will fit into

Ingredients:
1/2 gallon whole milk
1 quart buttermilk

In the pot, add whole milk and heat until boiling.  Removed from heat and steadily add the buttermilk while stirring continuously.  Right away, you will notice that the mixture begins to curdle.  Continue to stir until there is a distinct separation of milk solids and whey.
Pour the mixture into the colander that has been lined with cheesecloth.  The cheesecloth should but cut large enough to drape over the edges.  Allow to drain into a bowl.  Once it is mostly drained, gather the ends of the cheesecloth and twist together so cheese forms a ball.   Don't worry too much about squeezing all the whey out.  Move to the jellyroll pan where you have placed one plate, upside down, rim exposed.  Place the cheese ball inside the plate rim.  Place the other plate, right side up, on top of the cheese ball.  This way, the cheese will "form" inside the plate rims.  Place another slightly weighty object on the top of the upper plate.  Leave this configuration in place for about 30 minutes.  The weight of the upper objects will press most of the whey from the cheese.  Our instructor at CIA encouraged us to not squeeze so much of the whey out that the cheese becomes dry.  Remove the objects from the cheese.  Gently peel off the cheesecloth.  Wrap in saran wrap and refrigerate.  This paneer is large enough for two batches of saag paneer.  It may be frozen.
heat milk to boiling

steadily pour buttermilk into hot milk, stirring continuously

milk solids begin to separate 

pour into a fine mesh colander lined with cheesecloth

remove cheese in cloth from colander

twist ends

place onto inverted plate (seated inside a jellyroll pan)

place second plate on top of cheese

allow to drain for 30 minutes


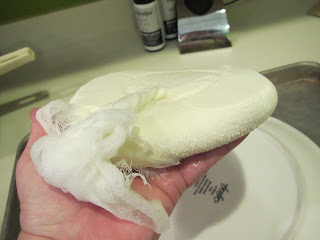
remove cheesecloth (peel gently away from formed cheese)


wrap in saran and refrigerate until use

Tip:  it is wise to prepare the cheese at least a day in advance of constructing the saag paneer, in order to save prep time prior to service.
Next post:  Making the wonderful saag recipe!

Tuesday, November 22, 2011

How to Make Stock

I'm not sure why, but there is a lot of mystique surrounding the idea of making your own stock, which, in my humble opinion, is one of the cornerstones of many home-cooked meals.  Basically, stock is some combination of bones and water, or vegetables and water.  If you like soup (and who does not??) let me tell you:  you NEED to know how to make stock, and it really couldn't be easier.
There are many kinds of stock:  poultry, fish, meat, and vegetable, or some combination thereof.
Let's begin with a combination poultry-vegetable stock.

Here is one little tip:  after you prep vegetables and herbs for a dish, take some of the scraps, and I'm talking about onion skins, parsley stems, mushroom stems, and toss them into an old plastic grocery or ziploc bag and into the freezer.  The same with bones, although I would probably separate the richer bones such as steak or lamb, from things like chicken bones.  The same applies to fish bones, or, you can ask your friendly fish monger at the market to save you some fish heads/bones after prepping an order.  I use bones of milder fish, such as snapper, and veer away from stronger tasting fish, such as salmon, for making stock.  Save the shrimp shells in a ziploc bag in your freezer and toss them in with the other fish bones for stock.  Get the idea?  It is really a cheap, easy way to make something wonderful!

Tonight I made a wonderful roast chicken for dinner.  Since it was just my husband and I, I knew I would have leftover meat.  First, turned the oven back on to 350'F and allowed it to heat up while I picked the meat from the carcass and stored it in the refrigerator for a future meal.  Next, I tossed the bones into a shallow baking pan and roasted them for about 15-20 minutes.

 Roasting is optional, but it seems to enhance the flavor quite a bit.  If you want to skip this step, simply toss the bones into a pot that is deep enough to cover the bones.  Turn the stove to a low heat and add whatever vegetable scraps you have on-hand.  In my case, I had some onion scraps, a couple of garlic, stems from some Italian parsley, and I also added 3 dried bay leaves, a small amount of black peppercorns, a few coriander seeds, and 2 cardemom seeds (I really don't know yet if this is a good idea).


I decided to pick a stem of rosemary from one of our prolific bushes in the garden.  Since it is so strong I chickened-out and only put a few "needles" into the stock pot.


 I also added about a cup of white wine that was left over from an earlier dish.  Adding white wine to fish, chicken, or vegetable stock adds depth to the flavor, and adding red wine (just a bit!) to your red meat bones stock adds flavor.  Just don't overdo the wine. And add the same wine you would drink.  DO NOT use that horrid, vile cooking wine.  Just say no.


 As to the herbs:  use what you have, and add what is in season.
Do NOT add salt.  Think of your stock as a "blank slate" to which you add more seasonings in the final dish.  This is one of the ways that stock varies from broth.

How long should stock simmer? Simmer is the key word:  don't boil. Well...how long do you have?!  With fish/seafood stock, an hour is ideal.  Poultry is great if it simmers a minimum of 2 hours, but if you can allow it to simmer up to four hours, so much the better.  Beef. lamb and game can go longer.


Skim the surface of the stock occasionally to remove any foam that comes to the surface.

Once you are satisfied with the amount of time you have allowed the stock to simmer, remove it from the heat and allow it to cool a bit.  Strain with a fine strainer, perhaps even lining the strainer with cheesecloth.  Be careful if the contents are still warm!


After straining you may continue to reduce the stock with further simmering.  Of course, reducing the stock intensifies the flavor and it will take up less room in your refrigerator/freezer.  You can always reconstitute it with water when preparing to use it in a dish.  Reduced stock is wonderful for things like pan sauce and gravy.  It can be frozen in ice cube trays and the cubes dumped into a ziploc bag for storage in the freezer.  A few chunks of this will transform any soup:  guaranteed!

Or, you may wish to store just finished stock in plastic containers that should be (first) chilled in the refrigerator and subsequently frozen.  Freshly prepared stock should be used within a couple of days or frozen as soon as chilled.  It is good for up to 6 months in the freezer, longer if stored in a deep freezer.
strained chicken & vegetable broth, ready for the refrigerator!

......the next day.....
I put the stock back in the large stockpot and gradually reduced the liquid volume.
Note how much deeper the color appears.

I reduced the stock about 75%.  Now I'm pouring the stock into ice cube trays.

I will pop these into the freezer.


Once frozen, I'll pop them out of the trays and into a ziploc bag for easy storage and use.
Try it!